
How to Apply Laminate Sheets on Plywood — Step-by-Step
The right technique makes the difference between laminate that lasts 20 years and laminate that peels within months. This guide covers every step, from surface prep to edge banding.
Tools and Materials You Need
Before starting, gather all tools and materials. Stopping mid-application because something is missing leads to poor bonds and misaligned sheets. Contact cement begins to cure as soon as the two surfaces touch — you cannot reposition.
Laminate Cutter / Utility Knife
For scoring and snapping straight cuts. Must be sharp — a dull blade tears the laminate surface instead of scoring it cleanly.
Contact Cement + Brush
Solvent-based contact cement (SR998 or equivalent). Apply with a brush or notched spreader for even coverage on both surfaces.
J-Roller / Rubber Roller
For pressing the laminate firmly onto the plywood after bonding. A rubber mallet and wooden block can substitute for flat panels.
Router with Flush Trim Bit
For trimming overhanging laminate flush to the plywood edge after bonding. A sharp file can also work for small panels.
Metal Straight Edge + Pencil
For marking and guiding cuts. Never use a wooden ruler — the knife will cut into it. A steel ruler or aluminium extrusion works best.
PVC Edge Banding + Iron
Iron-on PVC edge banding tape for sealing all exposed plywood edges after the laminate face is applied. Essential — not optional.
At Samta Plywood Centre we stock the complete Durian laminate range — inner laminates in 0.8mm and 0.92mm, decorative laminates in 1mm, and special finishes. We also stock Greenlam, Cedarlam, Marino, Aroma and Romania laminates. If you are unsure which laminate suits your project, WhatsApp us a photo of your furniture or space and we will advise.
Step-by-Step Laminate Application Process
Follow these steps in order. Each step must be completed correctly before the next — especially the drying time for contact cement, which most errors trace back to.
Prepare the Plywood Surface
Sand the plywood face to 120 grit. Any bumps, dents or voids in the plywood will show through the laminate — especially on high-gloss finishes. Fill voids with wood filler, allow to dry, then sand flush. Wipe clean with a dry cloth to remove all dust and sanding debris. The surface must be completely dry — do not apply laminate to damp plywood.
Measure and Cut the Laminate Sheet
Measure the panel carefully and mark the laminate sheet with a pencil on the back face. Add at least 5–10mm overhang on all four sides — you will trim this flush after bonding. Score the cut line firmly with a sharp utility knife against a metal straight edge. For a clean snap, score 2–3 times, then bend the laminate away from the score line — it snaps cleanly along the score.
For curved cuts or cutouts, use a jigsaw with a fine-tooth downstroke blade, cutting with the decorative face downward to prevent surface chipping.
Apply Contact Cement to Both Surfaces
Apply a thin, even coat of contact cement to the back of the laminate sheet and to the plywood face. Use a brush or notched spreader — coverage must be complete with no bare patches. Any area without cement will not bond and will create a bubble.
Allow both surfaces to dry until they are completely non-tacky to the touch. In Ahmedabad's normal conditions this takes 10–15 minutes. In humid monsoon conditions it may take 20–25 minutes. Do not rush this step — pressing surfaces together before the cement is fully dry causes weak bonds and bubbling.
Align the Laminate Before Bonding
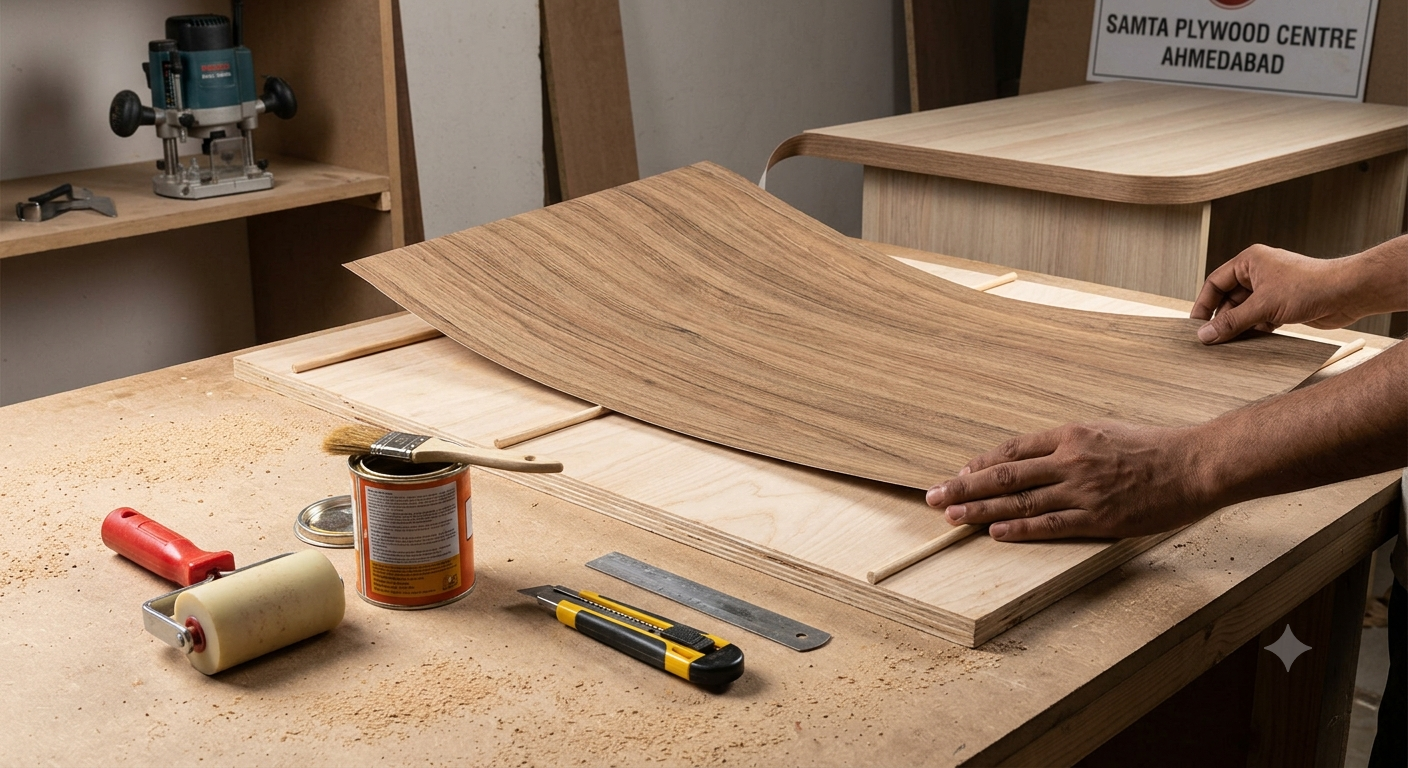
Once contact cement is touch-dry, the two surfaces bond instantly and permanently on contact — repositioning is not possible. To align safely, lay thin wooden dowels or sticks across the plywood panel at 20cm intervals. Rest the laminate on the dowels (cement sides facing each other but not touching). Position the laminate carefully so the overhang is even on all sides.
Then remove the centre dowel first and press the laminate down at the centre. Remove remaining dowels outward from the centre, pressing the laminate down as you go.
Roll and Press Firmly
Once the laminate is down, press firmly across the entire surface using a J-roller or rubber mallet with a flat wooden block. Work from the centre toward the edges to push out any trapped air. Apply firm, even pressure — do not skip areas or press only the centre.
Pay special attention to edges and corners, which are the first areas to lift if not properly bonded. Run the roller over every area at least twice.
Trim the Overhanging Laminate
Use a router with a flush trim bit to remove the overhanging laminate around all edges. The bit follows the plywood edge and cuts the laminate perfectly flush. After routing, run a smooth file along the trimmed edge at a slight inward bevel (10–15°) — this removes the sharp edge and prevents chipping when the panel is handled.
If you do not have a router, use a sharp file to carefully work down the overhang. Take light strokes toward the plywood face — never file away from it, as this can lift the laminate edge.
Apply Edge Banding on All Exposed Edges
Every exposed plywood edge must be sealed with PVC edge banding tape. Without it, moisture penetrates the raw plywood edge and the panel swells and delaminates from the inside. Iron-on PVC edge banding is available in colours to match most common laminate shades.
Set the iron to medium heat. Press the edge banding onto the plywood edge and run the iron along it slowly. The heat-activated adhesive bonds within seconds. While still warm, use a flat block of wood to press the banding firmly. Once cool, trim the overhanging edges with a sharp utility knife or edge trimmer for a clean, flush finish.
Common Laminate Application Mistakes — and How to Fix Them
Most laminate failures in Indian furniture are caused by the same handful of mistakes. Knowing them in advance prevents expensive repairs later.
Bonding Before Cement Is Dry
Pressing laminate onto wet cement creates a weak bond that bubbles and peels within weeks. Contact cement must be fully touch-dry on both surfaces before bonding.
Skipping Edge Banding
Raw plywood edges absorb moisture — especially in kitchens and near windows. Laminate lifts from the edges first, and once an edge lifts, the failure spreads inward.
Uneven Cement Coverage
Bare patches in the adhesive coat create unbonded areas that show as bubbles. These cannot be fixed after bonding without removing and re-applying the laminate.
Applying Over Damp Plywood
Plywood that is even slightly damp prevents proper adhesion. This is a seasonal problem in Ahmedabad — monsoon humidity raises the moisture content of stored plywood.
Not Filing the Trimmed Edge
A sharp right-angle laminate edge chips easily when panels are handled during installation. A bevelled or slightly rounded edge is far more durable.
Using the Wrong Grade of Plywood
Applying good-quality laminate over Commercial Grade plywood in a humid area (kitchen, bathroom, near windows) wastes the laminate. The plywood fails before the laminate does.
Laminate Maintenance and Care
Good quality laminate from Durian, Greenlam or Cedarlam is durable and low-maintenance. The following care practices will keep it looking new for years.
| Action | Status | Notes |
|---|---|---|
| Wipe spills immediately | DO | Laminate is water-resistant but not waterproof at edges — prolonged standing water at joints will cause swelling |
| Clean with mild soap and damp cloth | DO | Works on all laminate types including matte and high-gloss finishes |
| Use felt pads under objects | DO | Prevents fine scratches from ceramic, metal or stone objects dragged across the surface |
| Use abrasive cleaners or steel wool | DON'T | Scratches the surface permanently — especially visible on high-gloss laminates |
| Place hot pots or pans directly on laminate | DON'T | Heat above 120°C can blister or discolour laminate — always use trivets or heat mats |
| Use solvent-based cleaners (acetone, thinner) | DON'T | Dissolves the laminate surface resin and causes permanent dull patches |
| Cut or chop directly on laminate | DON'T | Knife cuts cannot be repaired — always use a cutting board on kitchen counters |
Frequently Asked Questions
Buy Laminate Sheets in Ahmedabad
Durian, Greenlam, Cedarlam, Marino and Aroma laminates — all available at Samta Plywood Centre, Lati Bazar. WhatsApp us your requirement for availability and pricing.
Explore More